WINDOWS AND MIRRORS
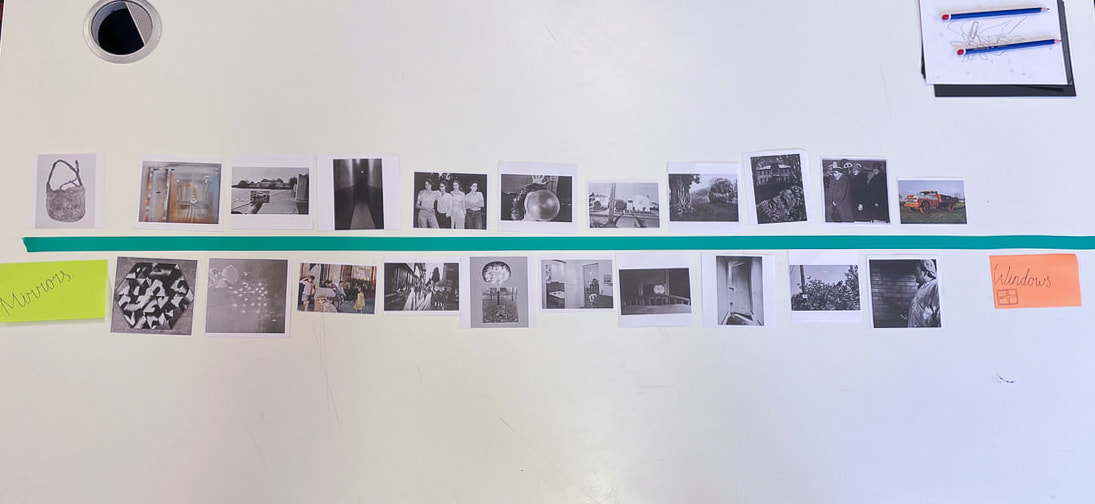
Today, we talked about the similarities and differences between windows and mirrors, as well as how both of those elements appear in images. The photographs labelled as "window photographs" were less personal because we were just looking in but didn't really relate to the image, while the photographs labelled as "mirror photographs" were more personal because they contained a reflection of us. The class discussed which category each photograph best fit into. Because images are subjective, each person had a different judgement on what category the photographs belonged in. For our task we were put in pairs and given a set of photographs that had to be arranged along an axis according to how much we thought the images were like windows or mirrors. We put post its notes at both ends of a line of tape, one labelled 'mirror' and the other 'window'.


MIRRORS


WINDOWS


CHANCE TWO FRAME EXPERIMENT
|
|
This video shows a game being played, the aim of the game is to create a variety of diptychs using a set of rules including a dice which allows the diptychs to be created by chance.
DELIBERATE DIPTYCHS


|
#1 The reason why I paired these images together was solely on the colours. Both images include really vibrant reds therefore I felt like the pictures complimented one another.
|
#2 I decided to pair these two images because they both incorporate similar themes, the image on the left is an old house/shed and the image on the right is of a scrap of plastic stuck to a pole, there was likely a poster stuck to it before. Both places look abandoned therefore I feel like they go well.
|


|
#3 I chose to pair these images because of their matching colour palettes, both pictures include reds and greens hence why I feel like they go together.
|
#4 I paired these two pictures because of their similar lines. In both pictures we see a line from the top left corner travelling down diagonally to the right. We can also see another line travelling across the whole picture in the middle. Both images look similar therefore I feel like they compliment one another.
|
CHANCE DIPTYCHS


LUKE FOWLER & JOHN MACLEAN IMAGE ANALYSIS
|
LUKE FOWLER
|
|
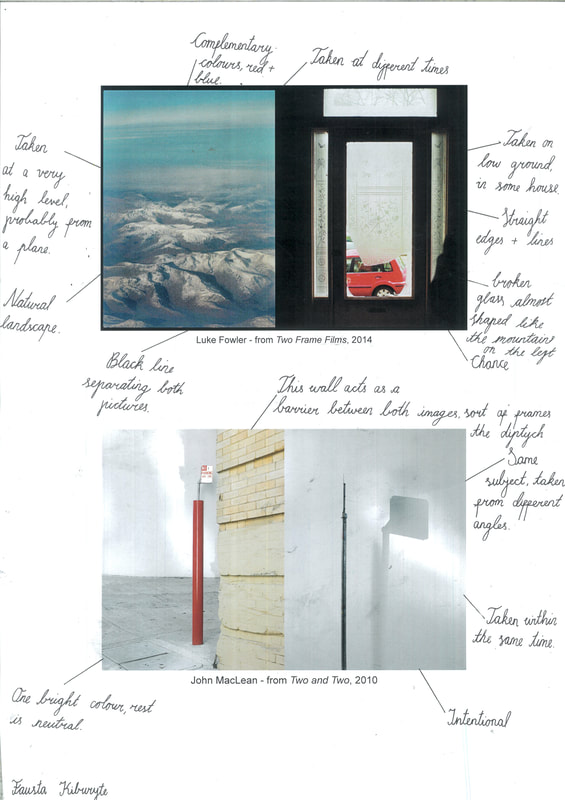
With a two-frame camera, Luke Fowler was able to take the shots in the manner that he did. A two-frame camera combines the images, sometimes deliberately and sometimes not. A diptych is a pair of two photographs arranged next to one another to express an idea or emotion. The colour and themes share some similarities. Luke Fowler's ability to direct his shooting was limited. By snatching several of them just seconds apart, he had the majority of the control. While others were randomly captured at times that could not have been planned to be close together. In my opinion, I like having as much control over my photographs as possible such as lighting and composition however I do believe that accidental photographs can occasionally look better.
JAMES MOLLISON
|
Through portraits and photographs of their bedrooms, James Mollison's Where Children Sleep series tells the experiences of various children from all around the world. A charity contacted Mollison a few years ago and challenged him to come up with a strategy for addressing children's rights. Aiming to address complex living situations and social issues affecting children, Mollison came up with the idea of looking at many children from all kinds of backgrounds and photographing their bedrooms. He immediately thought to how reflective his bedroom was of him, the way he lived, and his personality during his childhood. Mollison wanted to document more than only the suffering of children, he documented children living in wealthy as well as impoverished circumstances. I believe that Mollison's approach to documenting children was great, his diptychs make audience question the amount of people there are in this world and how many different living situations exist.
|
|


I hope my photographs will make people reflect on the idea or issue for that project. Maybe think about something they haven’t before. I’m very aware you can’t control what the viewer will think, and that there are many other readings depending on the viewer’s background.
-- James Mollison
IN SCHOOL PHOTOSHOOT


These are some pictures I took around school in preparation for creating diptychs. This is quite different from my other photoshoots as I incorporated a variety of materials, such as fabrics and ropes. We were also deliberately partnered up as we don't usually work together which sort of pushed me to step out of my comfort zone and create photographs unlike my other ones.
MY DIPTYCHS


The image on the right was picked out by chance, we were told to pick out a random book from the shelf and turn to page seventeen, this is the image I got. On the left is an image from one of my recent successful photoshoots. I chose to pair these images together as they both convey this empty feeling.


LAURA EL TANTAWY - BEYOND HERE IS NOTHING
The video above this text shows Laura El- Tantawy's photobook project titled "Beyond Here is Nothing". This project was inspired by Tantawy not having a sense of belonging anywhere and feeling "foreign" regardless of what country she was in. Born in the UK to Egyptian parents Tantawy spent most of her life between different cultures, living in England and America and going on holidays back to Egypt always left her questioning where her true home was and where she belonged. Tantawy's project was an exploration of the idea of what home was however, instead of labelling home as physical places such as a city or a country, she rather did it to an emotion and memories.
PHOTOSHOOT #1


We were sent in groups to wander around the school and create images inspired by Laura El Tantawy and "Identity". I wasn't really sure on how to take these images as I was limited to only taking them within the school grounds, school is part of my identity however it's not something I only want to be known as. I experimented with shadows and light in this task as I feel that they can be a metaphor for identity, the way that the light hits an object and creates a 'pattern' or an 'image' in the same way that people and their image are formed by having experiences. The creation of a shadow is an experience.
PHOTOSHOOT #2


EXPERIMENTING


MAX PINCKERS - THE FOURTH WALL
|
|
Max Pinckers photobook named "The Fourth Wall" incorporates text in within his book to add more narrative and context to the images he uses. The text is spread across a double page and is relatively zoomed in which is quite different to other photographer's photo books as their text is quite minimal and small usually framed in one corner of the page or placed under an image.
|
PHOTOSHOOT #3


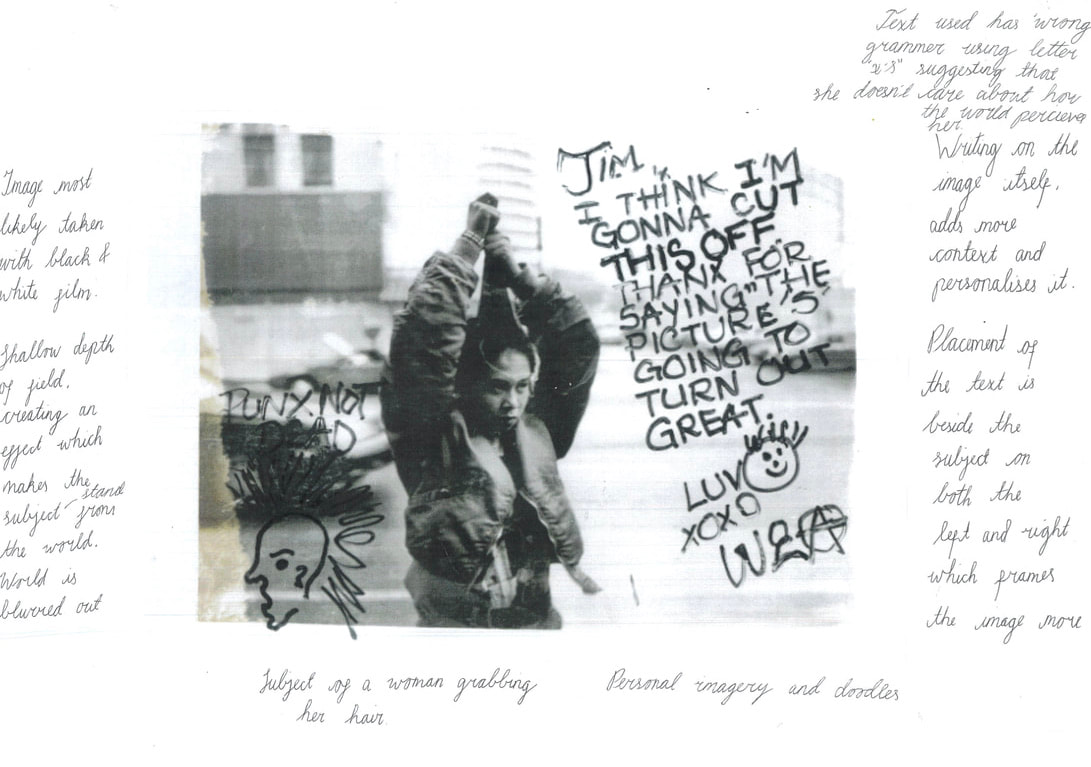
PHOTOGRAPHY AND TEXT, JIM GOLDBERG - RAISED BY WOLVES
|
HENRI CARTIER-BRESSON
The clear definition of "indecisive" is not having the skill of making decisions quickly and successfully.


THE DÉRIVE
A dérive is an unplanned journey through a landscape, usually urban, on which the subtle aesthetic contours of the surrounding architecture and geography subconsciously direct the travellers, with the ultimate goal of encountering an entirely new and authentic experience.
SITUATIONIST INTERNATIONAL AND PYSCHOGEOGRAPHY
The fusion of psychology and geography is known as psychogeography. A collection of poets, writers, and artists came together as The Situational International. The dérive was developed by the Situationist International as a weapon against capitalism. Every time we leave the house, we are surrounded by businesses selling things we don't need. The purpose of the dérive is to observe without absorbing your environment. A dérive is a spontaneous stroll around city streets that is dictated by the state of mind.


DÉRIVE #1


The first dérive I went on was collaborative and based mostly on chance which made me think of Threshold Concept #6 which is that photographs rely on chance, more or less. I decided to go on a wander and take photographs with another person from my class, we planned on sharing a camera and taking separate photographs. However, the camera we were using had a layering setting on which we didn't realise until we actually started taking photographs, so we decided we would take a photograph each merging one final image in the end. I quite liked this idea as it wasn't pre-planned and incorporated both of our styles into one image, you had to be cautious of the way you composed a photograph as it would affect the other image as well which I liked instead of mindlessly pressing the shutter button. This experiment/dérive reminds me of Boris Mikhailov, who created double exposed photographs.
DÉRIVE #2


For my second dérive I walked around Greenwich on my own, following whatever looked interesting to me. I liked this dérive as it wasn't stressful, instead of looking for particular subjects/compositions to take I just snapped a picture of whatever I liked.
DÉRIVE #3


This was my third go at a dérive and I'm happy with how some of the pictures turned out. I've noticed that I was quite drawn to bright colours and buildings on this walk which makes me want to further investigate/experiment with these things.
ISO
The ISO is your camera's sensitivity to light. The higher it is the more sensitive your camera becomes and the brighter the photo appears, vice versa with lower ISO. ISO is measured in numbers, some standard values include: 100, 200, 400, 800, 1600, 3200. If you were shooting in a dark setting and the shots kept turning out dark, working in a manual setting could allow you to boost your ISO and the shots would instantly become brighter. However it would be best to keep your ISO on the lowest values as the higher the ISO value the more noisier your shots can look.
APERTURE
The aperture is the opening of a camera lens, the larger apertures allow more light to hit the sensor which lightens your shot whereas, smaller apertures allow less light to hit the sensor which darkens the shot instead. ‘F-Stops’ are used to refer to the aperture sizes, a smaller f-stop would refer to a larger aperture like f/1.4. Aperture also controls the depth of field, the larger the aperture the smaller the depth of field.
SHUTTER SPEED
The shutter speed is measured in seconds and controls the amount of time a shutter is open for. The faster the shutter speed is the less light hits the camera sensor resulting in a darker image, shutter speed also determines the image sharpness. In most cases the best shutter speed to stick to is 1/60th of a second or faster as using anything slower may blur your shot.
SUNNY SIXTEEN RULE
The sunny sixteen rule allows you to estimate accurate daylight exposures without using a light meter.


PHOTOBOOKS
Japanese Bookbinding -
For my personal investigation I researched different ways of creating a photo book so I have a variety to choose from for my final piece. One of the ways I came across was Japanese bookbinding, I followed a tutorial on how to create one, here is the process below...
For my personal investigation I researched different ways of creating a photo book so I have a variety to choose from for my final piece. One of the ways I came across was Japanese bookbinding, I followed a tutorial on how to create one, here is the process below...


DEVELOPING & PRINTING IN DARK ROOM
To get a more clear idea on what I want to do for my photo book I experimented with film photography. I bought a roll of black and white film(AGFAPHOTO APX ISO 400) and took loads of photographs on an Agfa Ambi Silette camera. After I finished taking the photographs, the next day, I developed them in the school's darkroom with a teacher who taught me the whole process. A week later I printed my photos in the school's dark room. I began with creating a contact sheet, then picked out my favorite photographs and printed them. Here is the process and results...


OUTCOME


LAYOUT PLANNING
For my personal investigation I started experimenting with book layouts on "book wright", I have not yet decided on my final set of photographs however I started experimenting with different concepts and layouts. Since I'm making my photo book with film photographs I thought it would be interesting to add photographs of the process of me printing the film photographs into the photo book itself as well. I placed the process and final photograph next to one another and here are the outcomes...
I quite like this layout and think the reds and blacks work well with one another. I also enlarged the images fully so there is no negative space and the focus is on the images itself.


PRINTING #2
After taking a second roll of film(FOMAPAN ISO 200) I decided to develop & print the pictures in the school dark room like I did with the first roll of film. This time I made a contact sheet and took more photographs of the process which I could later on add in my photobook. Here are the results...


The pictures above show the process of me developing the photographs.


Here are two final photographs above that I printed/developed, I think they turned out pretty well however there are some marks on them that appeared during the developing process. I think these appeared because I took them out of the chemicals too quickly therefore it did not have enough time to develop and I also did not hang them to dry properly as I didn't have time and used a paper towel to dry them, instead.


SCANNING & REFINING ON PHOTOSHOP
I scanned all my images on a film scanner and then transferred them onto my laptop, I placed them all into photoshop and one by one I adjusted the levels and exposure to make the images more refined. I also used the spot healing brush tool to get rid of dust that appeared on the images during the scanning process, however I didn't remove all of them for a more grainy film like look. I had another set of film photographs I scanned in however the resolution went wrong during the scanning process and was impossible to enlarge and edit in the photoshop process so I just refined all the ones that were in good condition.
FILM


PROCCESS


OUTCOME #1
Overall I think the images turned out quite good for my first roll of film however some of them are out of focus or overexposed/underexposed which happened during the picture making process. I did enjoy using a manual as it did teach me a lot.


Here's my second outcome after I rescanned the film as its resolution was too low the first time.
OUTCOME #2


LAYOUTS
|
#1 Below is my first completed photo book draft. My objective for this layout was to show the process and making of the film photographs whilst also displaying the final outcomes next to them, telling a story of how far the photographs came and all of the steps they had to go through. The reds and blacks complimented each other and created a more dramatic effect on the book.
|
#2 Below is my second photo book draft, I think the photographs by themselves made them more noticeable and you could really take them in, unlike the first draft.
|
